File mapping is used to dynamically distribute publications to a list of email addresses based on selected slicers. When the publication is built on its schedule, the distribution list is used to decide who should be sent the publication using the mapped email addresses.
This topic is a walkthrough that uses the Email Distribution configuration options to achieve a specific goal. For more information about the Email Distribution options, see Email Distribution in Publish Pro.
Tip: You can, alternatively, distribute your publications to users dynamically through the Bulletin Board. For more information, see Dynamic Distribution to Bulletin Board in Publish Pro.
Setting up a Dynamic Distribution List
To distribute your publication to a dynamic list of users using email, you will need to:
- Build a mapping file that maps the slicer selections to email addresses. When selected in response to the dynamic distribution list, the users associated with the slicer selection will be sent the built publication by email.
- Create a Schedule for your publication:
A copy of the publication will be sent by email to all email addresses in the list.
Note: The emailing option is only operational if messaging services have been enabled in the Admin Console first.
Note: Sending as an attachment is only available with the External Bursting License.
Step 1: Building your Mappings file
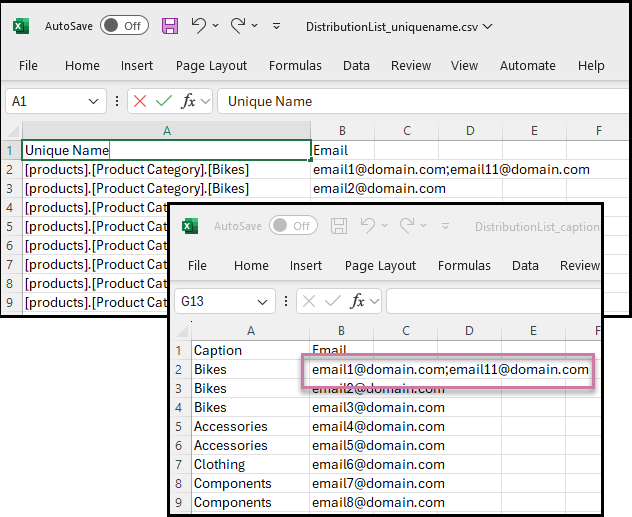
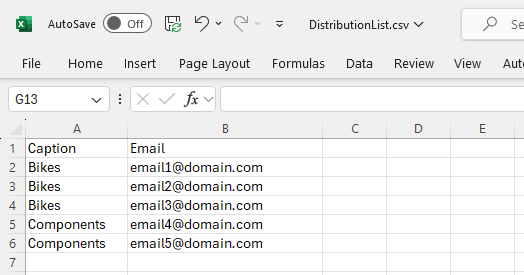
The Distribution List may be a .txt, .csv, or .tsv file. It maps the slicer members to the email addresses that should be used as targets for the given slice. It should conform to the formatting displayed in the image below:
Note: This format must be used, regardless of the number of slicers in the publication. If your publication contains multiple slicers, the distribution list should still contain only a single elements column, with elements from a single slicer only. The corresponding slicer will need to be selected in the Distribution panel when configuring your File Mapping options.
Header Row
The first row contains the headers for your file and is ignored by the mapping process. The list of elements and target emails or roles starts from the second row.
Column 1: Slicer Elements
The first column contains the names of the matching elements that are used in the slicer. These values must all be either Captions or Unique Names:
- Captions are the slice names, such as "Bikes" or "Accessories."
- Unique Names are the members described using PQL syntax, such as
[products].[Product Category].[Bikes].
All values are case sensitive.
Column 2: Recipients
Where distribution is to Email addresses, the second column contains the email addresses to select when the given slice value is selected.
Multiple email addresses can be mapped to a single slicer element by adding them as a semi-colon separated list of values. See purple highlight above.
Step 2: Configure your File Mapping options
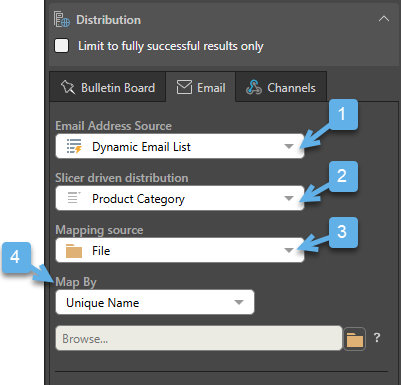
From the Schedule panel, select Distribution and then the Email tab:
- From the Email Address Source dropdown list, select Dynamic Email List.
- From the Slicer dropdown list, select the relevant slicer.
- Under Mapping Method, choose File Mapping.
- Under Map By, create the mapping:
- Choose either Unique Name or Caption depending on the content of your distribution file.
- Import your Distribution file by clicking the Folder icon next to the dropdown list and finding / importing the distribution list from its file location.
If your report contains multiple slicers, choose the slicer that should be used to lookup the distribution list. This is the slicer whose elements appear in the distribution list that will be imported.
Step 3: Configure your email template
When the scheduled publication is built, an email is sent to each of the recipients selected using the file mappings. This email contains the content specified by the Email Template options in the Email panel:
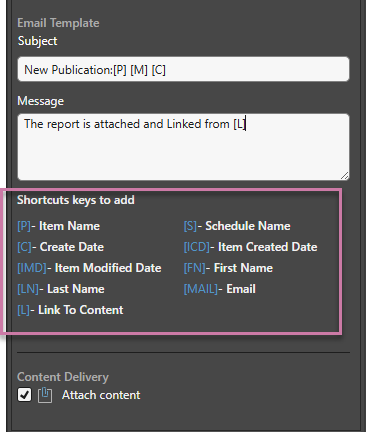
Email Template
Supply details of the Email message that should be sent to your recipients:
Subject
Use the subject field to summarize the main topic or purpose of the message.
Message
Add some message content for your email.
Dynamic Field Shortcuts
You can also add variables to your Subject and your Message that will be replaced with the relevant values when the email is created. See Dynamic Field Shortcuts (purple highlight above) for the full list.
Attach content
If you don't want to attach the content to the email, you can clear this checkbox.
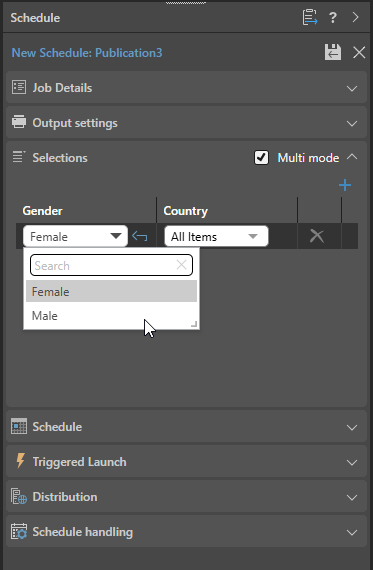
Step 4: Specify multiple slicer selections (Optional)
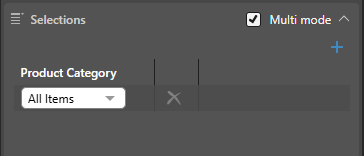
Set your Selections preferences as required. You will need to select the Multi mode checkbox if you want to select multiple slicer options.
Remember: All recipients selected from the dynamic list of emails will receive all copies of the publication that are generated according to the slicer preferences set in the Selections section. This means that if you have two slicers, both set to Every Item, then a separate publication will be generated for each possible slicer combination and every recipient will receive every copy.
- Click here for more information about selecting slicers
Step 5: Committing the Schedule
Once you are done building your schedule, click Save (purple arrow below) to save and launch it. You can view the schedule's progress in the Content Explorer (or from the Admin Console if you are an admin):
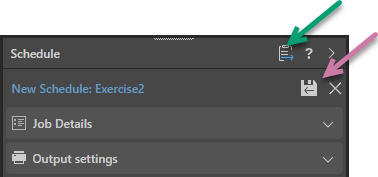
Note: When viewing your schedule in the Publish app, there is an option to go to the Schedule list in the Content Explorer (green arrow above). This provides access the publication's schedules for edit, delete, and so on and view any built publications.
Examples
Example 1: Single Slicer
If your publication contains a single Product Category slicer with the slices Bikes and Accessories:
- In your Mappings file, create mappings that indicate which email addresses to send publications to when the slices Bikes and Accessories are selected. These could be the email addresses for the department heads.
- In the Distribution panel, select Product Category as the distribution slicer and upload your mappings file.
- In the Selections panel, select the Product Category slices that should be associated with the schedule. For example, select the Multi mode checkbox and All items to select all options. In this case, a number of separate reports will be built and sent to the department heads identified in the mappings file.
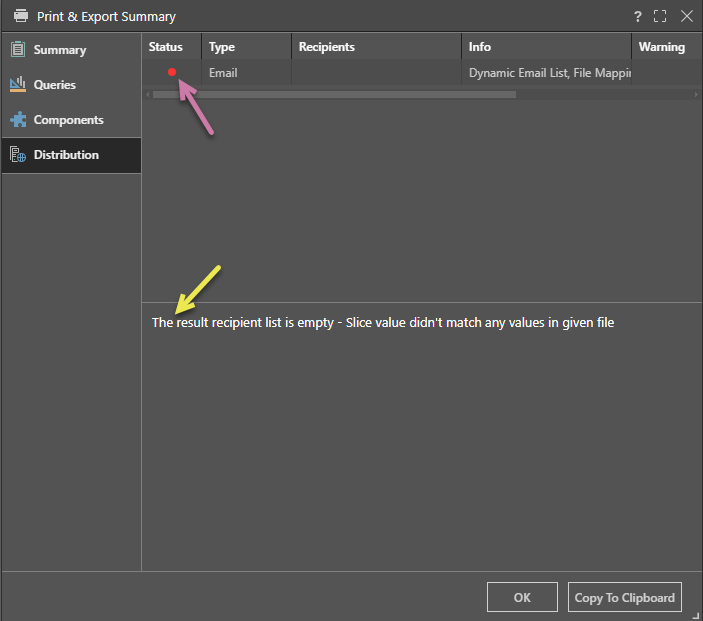
Note: If you select more options from the Selections panel than you have set up distributions for (for example, you select All items having only set to distribute files to recipients associated with Bikes and Accessories), then the distribution job will not run for additional slices. You will see details of this in the Print and Export summary.
If more slices were selected under the Selections window than exist in the imported file, this will be reflected in the publication's job executions summary.
- Mappings file: Specify mappings for two slices in the mappings file (Bikes and Components):
- Selections: Select All items under Selections to select all slices. Note that this means that more slices are selected under the Selections window than exist in the imported file (Product Category is actually a four-option list):
The distribution job does not run for the two slices that were not listed in the uploaded file (there was no Email target for either of the Accessories or Clothing captions). This is reflected in the publication's Print and Export summary:
Example 2: Multiple Slicers
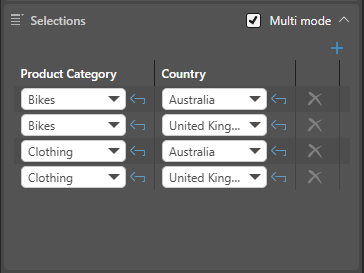
In this example, the publication contains two slicers: Product Categories and Country. The schedule is configured to produce reports filtered by Bikes in Australia, Bikes in the UK, Clothing in Australia, and Clothing in the UK. Each report generated will be sent to the head of sales for each product department in their respective country:
- Set the job details, selection, schedule, and triggered launch preferences.
- Under Selection, choose Multi mode and select the required slice combinations for the report.
Tip: Be aware that if you select Every Item, Pyramid will attempt to generate a publication for all possible slice combinations. For performance reasons, you should typically select only the required combinations.
Related information
You can distribute to both the bulletin board and email simultaneously; make sure Publish to bulletin board is not selected if this is not required. For more information about the Bulletin Board options, see Bulletin Board Distribution in Publish Pro.